What Is a Septic Tank?

Septic tanks collect wastewater and waste from toilets, sinks and garbage disposals and hold it in a buried tank. Solid waste settles at the bottom, forming sludge, and oils and grease float to the top, forming scum.

Bacteria break down these solids, and the treated wastewater exits into a buried drain field. A septic system prevents water contamination in surface and groundwater by removing sewage pollutants before they reach natural bodies of water. Contact Septic Tank Armadale now!

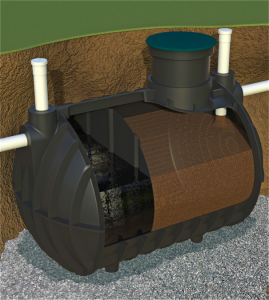
A septic tank is the first stage of wastewater treatment for your home. It is designed to hold waste from your household plumbing for an adequate time so that microorganisms can break down the solid waste and treat the liquid wastewater (effluent). The septic tank removes these solids from the waste before they exit your drain field, which can otherwise become waterlogged with untreated sewage.

The septic tank also contains a series of baffle walls that separate the wastewater into three distinct layers. Oils and grease float to the top of the tank, while wastewater and septic solids settle to the bottom of the tank in a layer known as sludge. The septic tank must be properly maintained so that the sludge layer does not build up to the point that it clogs the outlet pipe or drain field. This is accomplished by pumping the septic tank as needed and avoiding flushing non-biodegradable materials such as cigarette butts, cotton buds/swabs, and menstrual hygiene products.

During the septic tank process, bacteria generate gases that must be vented to prevent the pressure from building up and causing a blockage. These gases are released through a vent pipe located on the lid of your septic tank. This vent is typically a mushroom shape and can be fitted with a charcoal filter to reduce odors.

Once the septic tank is full, a tee pipe connects from your septic tank to an opening in the ground known as your absorption field or drain field. The tees ensure that only the liquid wastewater flows out of your septic system, and that no sludge or scum is pushed into the drain field. This prevents a clog and the premature failure of your septic system.

The drain field is an area of soil that allows liquid waste to seep through the soil and into groundwater or natural watercourses. To avoid contamination of the soil, the drain field is often located in a low lying area on your property. Depending on your septic tank design, the drain field may consist of multiple drain lines or just one large drain line.

How does a septic tank work?

The waste from your home drains into a septic tank which is underground. Solid wastes settle to the bottom of the septic tank, while grease and other lightweight materials float to the top of the wastewater (effluent). As the septic tank holds the water for a period of time, bacteria and yeasts break down the organic waste. The resulting liquid wastewater (effluent) then leaves the septic tank to be absorbed by soil in the drain field. The septic tank removes the large solid waste particles from the wastewater that would otherwise clog the drain field.

A septic tank may have one or more baffle walls which separate the different layers of solid waste in the tank. A baffle wall at the inlet of your septic tank directs the raw wastewater downward and reduces wastewater agitation, allowing more solid waste to sink and less water to float. This allows the sludge layer to be more effectively separated from the wastewater containing bacteria and lighter materials.

Your septic system has a network of perforated pipes connecting the septic tank to the soil absorption field. The liquid wastewater flows from your septic tank through the distribution pipe into your drain field. The soil in the drain field absorbs the effluent, treating it as it percolates through it. The soil also provides a buffer that helps to protect the environment and human health by reducing the amount of sewage that seeps into groundwater and surface waters.

Septic tanks with pumps typically have alarms that alert you when the pump needs servicing or the septic system is overflowing. Keeping septic systems properly maintained will help to extend the life of your tank and avoid costly repairs and replacement costs.

You can help prevent your septic system from clogging or failing by keeping the flow of wastewater to a minimum, especially in hot weather or after heavy rains. Water conservation practices and limiting the number of people taking showers or washing clothes at once can also reduce the load on the septic system. Avoid placing driveways, parking areas or other impermeable surfaces over the drain field and keep tree roots away from it.

How often do I need to pump my septic tank?

Having the septic tank pumped regularly is one of the biggest factors that determine how long it lasts. The tank needs to be emptied when the sludge level reaches about 1 foot at the bottom or when the scum layer is about 6 inches thick at the top. This will vary according to household size, use of garbage disposal and other variables.

If the septic tank is pumped too often, it reduces the bacteria levels in the septic system and can lead to premature failure of the septic system. It takes about 1-3 weeks for the septic system to reach the healthy bacteria levels required to function properly again after pumping.

Most septic systems will need to be pumped at least every five years. However, the tank will need to be pumped more frequently in larger households or if there are children living at home. If you’re unsure how often you should have your septic tank pumped, check with our professional staff and we can give you a recommendation based on your household size and tank size.

In addition to keeping your septic tank pumped, there are some things you should never put into your septic system. These include paint thinner, polyurethane, antifreeze, certain dyes, disinfectants and water softeners. The septic system is designed to handle the waste from your house, but not these products which can kill the bacteria and cause major problems in the septic tank and drain field.

A healthy septic tank contains anaerobic bacteria that breaks down the waste in a first stage and sends it to the drain field for further treatment. A regular pumping schedule keeps the sludge and scum layers separated and allows the anaerobic process to work efficiently.

Regularly having the septic tank pumped also helps to keep the absorption field, drain line or leach field from becoming waterlogged or clogged. If these fields become clogged, they may not be able to accept the sewage waste and it will start flowing into household drains. This can lead to health hazards for your family, especially if there are young children in the home.

What is the best way to maintain my septic tank?

Many homeowners make the mistake of assuming that as long as their used water “goes away,” their septic system is working properly. However, the only way to know whether a septic tank is truly treating sewage is by having it regularly inspected and pumped. Common signs that a septic system is not functioning as intended include wastewater seeping into homes and yards, sewage surfacing in lakes or rivers, excessively strong odors from drains or toilets, and high levels of coliform bacteria in well water tests.

While the best thing you can do to ensure your septic system works as it should is to have it inspected and pumped at least once every three years, there are several additional steps you can take to keep your septic system healthy and functioning properly. These include:

Avoid using chemical drain openers. These can clog your drains and damage your septic tank and drain field. Instead, try boiling water or using a drain snake. Reduce your use of a garbage disposal, since this can add a significant amount of fats, oils and solids to your septic tank. If you must use a disposal, limit the number of times per day that it is used.

Don’t run a laundry washing machine more than once or twice a day, since too many loads will overwhelm your septic tank. Excessive washing loads also prevent your septic system from having sufficient time to naturally cleanse and disinfect the wastewater that is sent to it. Consult your septic tank professional to determine the gallon capacity of your tank and the maximum number of wash loads you should perform each day.

Inspect your septic tank baffles to make sure they are not missing, broken, or deteriorated. The baffles restrain and redirect the flow of septic tank sludge and scum to help prevent them from clogging inlet and outlet pipes.

Never plant trees or shrubs within 30 feet of your septic system or drive vehicles or heavy equipment over the drainfield. These plants may grow roots that can clog the pipes. Instead, plant grass or other shallow-rooted plants that can absorb some of the rainfall.

The Different Types of Roofing Installation

Before starting the actual roofing installation, your contractor will prepare the area. This involves laying tarps to protect your landscaping, removing debris and possibly making repairs.

Roofing

Roofers will then install underlayment — a protective barrier made of felt paper or another material. Visit https://www.corpuschristiroofingco.com/ to learn more.

They’ll also install flashing around chimneys, windows and other structures. Finally, they’ll cap the ridge with special shingles.

Wood is a beautiful roofing material that can enhance the look of almost any home. However, it requires regular treatments to protect it against weathering and mold. It is also flammable and should not be used in areas where wildfires are common.

Wood shingles are usually machine-sawn, with cuts made either along the grain or against it. Wood shakes, on the other hand, are hand-split so that one side is always along the grain. This makes them more durable and wind resistant. The varying texture of shakes creates beautiful shadow lines and adds depth to the roof, while the thick butt ends give it a rustic appearance.

A wood shingle or shake roof must be properly ventilated to avoid structural damage and water leaks. Proper ventilation also helps prevent rot and algae, which can degrade the roof. In addition, proper installation techniques and materials are crucial to maintaining the integrity of a wood roof.

When shingling a wood roof, it is important to use rust-resistant nails. Nails must be long enough to penetrate 128 mm (1/2 in) into the sheathing or deck. It is also important to install spaced sheathing to allow for proper venting and prevent the shingles from overhanging the eaves or soffit.

Before starting to shingle, it is vital to prepare the area by putting down protective coverings and wearing safety equipment, such as gloves, a harness, and a respirator. Also, you should have all the tools needed for your project, including a ladder, roofing felt, nail gun, hammer, and a pencil. Lastly, make sure you have a ladder that is tall enough to reach the roof. Also, be sure to have a partner to hold the ladder while working and help you with tools when needed.

Asphalt

Asphalt is the most popular roofing material. It is also used for paving roads, parking lots, railway tracks, and airport runways. The raw materials that make up asphalt are aggregates such as crushed rock, sand, gravel, and recycled material, and a binder material like bitumen.

Erie Home offers a wide range of asphalt shingles that can last up to 30 years. Shingles are one of the easiest types of roofs to install. However, working on a roof is not an easy task for those without experience. It is important to follow the proper safety guidelines and avoid doing any work in wet or icy conditions. It is also important to ensure proper ventilation with a premium ridge vent. This plays a key role in your roof’s lifespan.

Metal

Metal roofs are becoming more popular again, and they’re available in a variety of styles to fit most architectural homes. They’re highly durable and fire resistant, and they can last up to 50 years or more with little maintenance. They are also energy efficient, saving homeowners money on their heating and cooling costs. However, because of the steep price tag for this type of roofing, it’s important to do your homework and find a company with experience in installation.

There are two types of metal roofs: Standing seam and panel. Both require different roof preparation, so it’s best to consult with a professional to determine which is the right fit for your home. With a standing seam metal roof, the panels are locked together at the joints with special clipping systems. If you are considering this type of roof, make sure the installer uses clips that are specifically designed for standing seam roofs to ensure a secure and waterproof seal.

A panel metal roof starts out as a metal coil, which is processed into sheets and rollformed into panels for installation. The ribs and other structures are added to the metal sheets. Some roofs are vented at the ridge, so you will need to choose between a vented or solid closure strip.

Some metal roofs look very much like traditional shingle or tile roofing, and you can even get them in colors that match other building materials, such as wood. There are also metal roofs that resemble clay tile or stone, and they come in different profiles and finishes. Many are textured, which gives them a more natural appearance. Some are rust-resistant, making them a good choice for coastal areas or in high humidity zones.

Slate

Slate is a beautiful, natural roofing material that offers exceptional longevity and beauty. It is a highly durable material that will withstand high winds and hail without damage. Slate is also available in a variety of colors and styles, making it an ideal option for many different home designs.

Slate consists of natural rock that has been split into thin sheets with two lines of breakability – cleavage and grain. Slate is composed primarily of mica, chlorite and quartz. A number of other minerals are sometimes present in slate, including graphite, feldspar, hematite and tourmaline. The most common use of slate is for roof coverings, where it provides a unique and lasting aesthetic for the building.

When installed correctly, a slate roof can last up to 150 years, although the lifespan depends on the quality of the roof and how it is maintained. This is why homeowners should choose a roofing company with experience installing slate roofs and the necessary knowledge of its maintenance.

Because slate is heavy, it requires a strong and sturdy roof structure to support it. In addition, the installation process is time consuming and labor intensive, so it should only be done by a qualified roofing contractor.

Unlike shingles, slate does not need to be sealed after installation. However, it should be coated with a protective roof membrane to prevent the growth of mold and fungus. NRCA recommends using a self-adhering polymer-modified bitumen membrane as the underlayment for slate roofs.

In addition to the roofing material, the flashing system of a slate roof is important for proper water resistance. Standard sized slates are fastened with two nails, while thicker slates require four nails. NRCA suggests a center rib for valley metal pieces, which is especially beneficial when adjacent roof areas are of unequal slope.

Clay

Clay roofing tiles are not as common as shingles but are an excellent alternative. They are durable and can withstand extreme weather conditions, including hurricanes and high winds. They are also energy efficient and have insulating properties. Their natural color and reflective properties keep homes cooler than shingles, which can reduce heating and cooling costs. They can also add value to a home and are available in a variety of styles and colors.

Tiles are made by baking molded clay until they harden. The result is a durable, energy-efficient roof that can last more than 100 years. They are available in a wide range of earth tones and blend well with both traditional and modern style homes. This type of roof is expensive but can be offset by state and federal tax credits.

Installing a tile roof requires an experienced contractor to ensure that the roof deck is strong enough to support the weight of the tiles. It is also important to properly install the underlayment, which will increase your roof’s watertightness.

Start by assessing the roof deck and repairing any areas of rot or damage. Then, begin installing the underlayment. Roll out the underlayment 10 foot (3 m) sections at a time, and secure it to the roof with nails spaced 24 inches (61 cm) apart. Be sure to leave a 3 inch (7.6 cm) overlap, and double-check your measurements as you go along.

When installing a clay tile roof, always observe the work from below to make sure that it is straight. Because it is a natural material, the clay can change color with exposure to sunlight and heat. It is also a good idea to check the underlayment regularly for leaks and damage, as well as to keep debris and moss out of the roof.

How to Find the Right Window Replacement for Your Home

Window Replacement Ellicott City, MD is an important home improvement project that can save energy, add comfort and increase property value. But the process can be time-consuming and costly.

Window Replacement

Some homeowners choose to replace their windows in stages, doing one room at a time to spread the cost and disruption. Others do nothing more than repair existing windows.

There are many different types of replacement windows on the market and finding the right one will depend on a variety of factors. The style and operating method of the window, how it will be used in your home, and what type of performance you need from it are all important considerations. The frame material and insulation of the window are also important factors in deciding on the best replacement window for your home.

The most common type of replacement window is a double-hung window. These are very versatile and can be adapted to almost any house style. These windows offer increased airflow and are easier to clean than single-pane windows. They can be opened in a way similar to doors, making them ideal for kitchens and bathrooms.

Another type of replacement window is a bay or bow window. These are perfect for adding a visual focal point to your home. This type of window can add a sense of depth and drama to your living space, while also increasing natural light and enhancing privacy.

Bay and bow windows can be installed in various positions within your home, allowing you to make the most of their unique shapes. They can be fixed in place, allowing them to open like traditional windows or they can be hinged at the side so that they may be opened outward. These windows are also available in a wide range of colors and materials, ensuring that you can find the perfect match for your home.

Full-frame replacement windows, also known as new construction windows, are designed to be installed during a building project or major home renovation. They have nailing fins that are nailed directly into the wall of your home, and are often used in new construction projects or extreme repairs when the existing structure is beyond repair.

Insert replacement windows, on the other hand, are designed to be installed into the existing frame of your home. This type of replacement window is ideal for upgrading your current windows, as it allows you to keep the existing trim and siding intact, and is generally a much faster installation process.

Replacement Window Materials

If you want to upgrade the look of your home or save on energy bills, the frame material that holds the glass is a key decision. Each material offers advantages and disadvantages that you need to weigh.

The best choice for traditional homes is wood, which is durable and can be stained to match your décor. Wood frames are also natural insulators, which will keep your home more comfortable year-round. However, they can require more maintenance than other types of frames because they are prone to moisture damage and mildew.

Another option is fiberglass, which is a strong and insulating material. Fiberglass frames are not real wood, but they can be made to look like it and may include options for stained or painted interiors. Fiberglass is available at a lower price than wood or aluminum and is easier to maintain.

Aluminum is another popular choice for modern styles, as it is strong and resists corrosion in harsh environments. Aluminum frames are not as good at insulating your home, but they are less expensive than most other materials.

Composite frames are another option that combines the strength of different materials to create a stronger product. Owens Corning has a line of composite windows called Generations, and Marvin offers a line of Integrity windows made from Ultrex, which is a mixture of fiberglass and polymer resin.

Some frames are better suited for certain styles of homes, and you should discuss your preferences with your window installer before making a final decision. For example, iron frames are very durable and can add a classic touch to any style of house, but they must be carefully maintained to prevent rust or oxidation. You should also consider the durability of the glass you choose, as well as its ability to reflect sunlight and heat from indoors. If you are concerned about energy efficiency, then double- and triple-pane glass is the way to go. These glasses are thicker than single-pane glass, so they are more effective at keeping your home warm in winter and cool in summer.

Replacement Window Installation

Installing replacement windows takes skill and knowledge of proper installation techniques. While DIYers can take on this project, it’s often best left to a professional contractor to ensure your new windows look and work great. Improper installation can result in drafty windows and high energy bills. In fact, poorly installed windows can even damage your home’s wood frame and drywall.

A full-frame window replacement involves removing the existing glass and sash, as well as the interior casing and trim around the opening. The old frames are removed and the new sash and window frame are installed in the opening, usually using a bead of caulk to seal the gaps between the new frame and house wrap or sheathing. During the window replacement process, contractors will check for any damage or rot and may need to perform a “cutback” by removing a strip of sheetrock and/or a section of window stool in order to accommodate the new frame.

While full-frame windows are ideal for new construction, many homeowners opt for a retrofit installation instead. Designed to fit into existing openings, these windows are available in dozens of standard sizes and styles, and can be fitted into almost any old or new frame. To install the window, the old sash and aluminum tracks are first removed, which can be done by loosening the sash pulleys with pliers and pulling out the sash tracks. Next, the window is inserted into the opening and shimmed to ensure it’s level and plumb.

When the window is in place, it’s insulated and sealed, preventing drafts and improving energy efficiency. Foam or fiberglass insulation can be stuffed into the frame, and the sill and jamb extensions are caulked. Finally, the sash is reinstalled into the track and the sash lock is engaged.

Before the crew leaves for the day, they should walk through the scope of the job with you to make sure you understand the process and answer any questions. Afterward, they should clean up the work area and dispose of any leftover debris. They should also inspect the frame to make sure it’s straight and free of mold or mildew. It’s important to do this because a crooked window won’t open, close or lock correctly and can damage the surrounding framing.

Replacement Window Warranty

When purchasing replacement windows, it is important to find a company that offers a warranty you can trust. By delving into specifics of coverage, asking pivotal warranty questions, and adhering to maintenance guidelines, homeowners can secure lasting protection for their investment.

Warranty lengths vary, but typically fit into one of three categories; lifetime, limited lifetime, and timeframe warranties. Lifetime window warranties cover all aesthetic and functional parts of the window for a certain amount of time, limited lifetime warranties cover only specific parts or types of defects, and timeframe warranties are good for a set number of years.

A few key factors to look for in a warranty are the following;

Generally, a manufacturer’s warranty covers all parts of the window that will likely need to be replaced, including the vinyl sash frame and mainframe, moving parts, fiberglass screen and screen frame, and the insulated glass unit. Some manufacturers also offer a lifetime glass breakage warranty that covers the cost of replacing any cracked or chipped glass in the event of accidental breakage. This optional warranty can be added to the contract at the time of purchase.

In addition to the coverage, it is essential to find a company with a solid reputation for providing quality products and exceptional service. By researching customer reviews and industry certifications, finding out how long the company has been in business, and checking for proper licensing and insurance, homeowners can feel confident in their choice to work with a company that offers a comprehensive warranty.

Finally, it is important to check if a window company has a stipulation for transfer of the warranty to a new homeowner, especially when a home is sold in a short period of time after the installation. Some companies have a one-time transfer only while others allow transfer to any subsequent owner of the property for up to 20 years.

Window replacement is a substantial financial commitment for any homeowner, and it is important to find a company that will stand behind their products and services. By examining the details of each manufacturer’s warranty, asking the right questions, and adhering to maintenance guidelines, consumers can ensure they are getting a valuable product that will last a lifetime.

Branching Out: The Importance of Professionalism in Tree Removal Procedures

When it comes to Tree Removal Baltimore, you want to work with a professional service that has the proper equipment and expertise. They will clear the area around the tree to ensure that there is room for it to fall and that no one or anything can get harmed in the process.

1. Assess the Tree’s Health

tree removal

Trees are vital to the ecosystem on your property, but they also can cause problems if left unchecked. Whether due to storm damage, neglect, or a disease or pest infestation, a weakened tree can become a danger for your family and others on the property. Some trees may even need to be removed entirely if they are no longer safe for people or structures.

The best way to determine if a tree needs to be removed is to consult an expert. A trained arborist can help you identify the best course of action for your specific situation, including pruning, cabling and bracing, or removal. If the tree is showing signs of poor health, such as discolored leaves or premature leaf fall, visible cracks in the trunk, or a large amount of hollowness, it’s time to consider removal.

Another sign that a tree is unhealthy is when it’s close to or encroaching on nearby structures, such as houses, barns, or power lines. If the roots are threatening to crack sidewalks or driveways, or if the branches are contacting roofs or walls, it’s important to have these hazards addressed before they get worse.

Depending on the location of the tree, you’ll want to prepare the area before the professional arrives for the removal. This will involve removing lawn furniture, potted plants, toys, and anything else that could get in the way of heavy equipment during the process. You should also ask the professionals about their plan for protecting your landscape and hardscaping from damage during the tree removal.

2. Plan the Routes

Trees provide many benefits to homes and businesses, including shade in the summer and beautiful fall color. However, there are some cases where a tree needs to be removed, such as if it’s damaged or dead. Tree removal can be a complicated process that requires a high level of knowledge and skills. It’s important to hire a professional for the job so that it’s completed correctly and safely.

The first step is to determine if the tree can be felled in one piece. This will depend on the size of the tree, its location and the surrounding landscape. A small tree may be able to be cut down in one fell, but larger trees will need to be broken down into smaller sections. This can be done by setting a rigging cable from the middle of the tree and climbing up to start cutting down the limbs. They’ll also need to plan escape routes in case the tree falls unexpectedly.

A big part of the process is ensuring that the tree can fall freely to the ground without hitting any buildings, cars, fences or power lines. The tree removal professionals will circle the tree and look at it from all directions to make sure there is enough space. They will also check for any leans in the trunk. If a tree has a serious lean or is located near a home, power line, driveway or waterline, it’s best to call in a pro.

Before the professionals arrive, it’s a good idea to clear the area around the tree of any breakable items and vehicles. This will make the removal process much faster and safer for everyone involved. It’s also a good idea to ask the company what their clean-up processes are like.

3. Prepare the Area

Depending on the circumstances, tree removal can be a complicated process. To avoid damage to property or injury, you should follow certain precautions and preparation steps. For example, you should clear the area where the tree is going to fall and make sure that there’s enough space for it to lie flat. This is especially important if you’re removing a large or very old tree, as these may cause significant damage when they fall.

It’s also a good idea to clear the surrounding area of any objects that could get damaged by falling limbs or debris. This can include cars, buildings, fences, and power lines. Moreover, you should make sure that there is enough room for the crews to drive their vehicles and feed green waste into the wood chipper. If possible, you should also locate these areas as close to the tree as possible to reduce hauling distances.

Next, you should use ground limestone and a high-quality topsoil to fill the hole left behind by the stump. Then, you should plant grass seeds or other plants that will help restore the soil’s nutrients. Finally, you should give the soil a few years to stabilize before planting new trees or shrubs.

You can remove a small tree by yourself if there’s enough space and you have the right equipment. However, you should always wear safety gear like heavy gloves, boots, a hard hat, and ear protection. You should also use a chainsaw that has a bar that’s at least as long as the tree’s diameter and a tree-felling wedge. In addition, you should examine the tree for any signs of decay or areas that are likely to collapse. You should also pick an escape route in case the tree begins to fall unpredictably.

4. Remove the Branches

Trees are essential to a healthy landscape, providing beauty and shade while helping to maintain the soil’s moisture. However, sometimes they need to be removed when they’re dying or in danger of falling. A dead or dying tree is a safety hazard and can damage homes, cars, fences, and other structures on the property. In addition, they can attract pests and spread diseases to surrounding plants. This is why it’s important to hire an arborist for the job. An arborist can assess the condition of a tree and determine if it needs to be removed.

The first step of removing a tree is to cut down the branches and limbs that are hanging over people or buildings. Arborists use a chainsaw to make the cuts, which are often very precise. This ensures that the limbs are removed safely and the trunk is left intact. If there’s enough space, an arborist can fell the entire tree in one piece, but this method isn’t practical if the tree is near power lines or buildings.

When removing lower branches, an arborist will always trim them as close to the trunk as possible. This will prevent them from tearing away from the tree and help it heal faster. When removing a dead branch, it’s also important to remove the stub that’s left behind. Leaving this stub can cause water damage and give insects an entry point into the wound. To avoid this, an arborist will make three cuts to remove the limb. The first is a notch cut at the bottom of the branch where it meets the trunk. The second cut is just outside of the branch collar, which is the area where the stem tissue and bark meet.

5. Remove the Stump

The final step in the tree removal process is to remove the stump. This can be done in a number of different ways, depending on the situation. One option is to use a chemical stump remover. This involves drilling a series of evenly-spaced holes into the stump and pouring a chemical over it. The stump will then absorb the chemical, which causes it to rot. This can take a few weeks, but eventually the stump will be soft enough to remove with a mattock or ax.

Another method is to dig out the stump and roots manually. This is a very labor-intensive process, and it can be difficult to complete on your own without the help of heavy machinery. It’s also important to make sure that you don’t accidentally break any of the roots in the process, as they could re-sprout.

Stump grinding is a more effective method of removing stumps, as it involves using a machine to grind the stump into wood chips. This method is faster than digging out a stump, and it’s also much safer. However, it can be expensive, so it’s typically reserved for larger stumps that aren’t easily removed by hand.

If you’re not able to afford to hire a professional to remove a stump, you can try to speed up the natural decaying process by keeping the stump moist and using high-nitrogen fertilizer or potassium nitrate stump-removal granules. It can take months or even a year before a stump fully decomposes, but it’s an option that’s fairly safe and doesn’t require any heavy equipment. Just be sure to follow all safety guidelines and check with your local fire department before attempting this method.